Asus Chromebox with Full Linux Install
This post is made possible because of the resources that others have provided. The purpose of this walkthrough is to provide details on how I set my Chromebox for my own use – with a standalone boot of Ubuntu Linux (14.04). I have also set up my Chromebox with VNC for local access (or remote desktop access) and Plex Home Theater, which I will go over as well.
Home Setup
At home, I have a Synology DS212j, which has been updated with the DS215j. The DS212j contains all my media (movies, tv shows, music, photographs) and works well hosting those files. It also runs perfectly fine running Plex Media Server (PMS). The limitation of running PMS is that the Synology DS212j (or DS215j) do not have the processing power to transcode my .mkv media. In otherwords, you cannot directly play a video from the Synology NAS unless the hardware (laptop, desktop) you are using to view the media is capable of transcoding the media. Using a tablet, phone, Chromecast, Roku with the Plex app will not work.
I previously used my primary desktop computer, which has Plex Home Theater (PHT) installed, to connect to the PMS on my Synology NAS. The computer was then connected to the TV via HDMI. This worked fine, but it was troublesome when I didn’t want to leave my computer on all day, waste electricty, and generate extra heat during the summer.
The Best HTPC For Me
There are several HTPCs available, but I wasn’t looking to spend more than $150, and I wanted it with low power consumption, a small footprint, and the ability to boot into Linux directly. This is something that I would be comfortable running 24/7 without feeling like I’m wasting electricty.
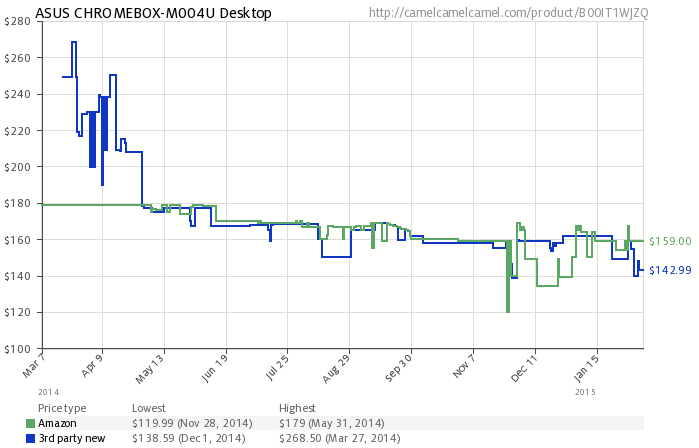
The Asus Chromebox fits the bill perfectly. There are resources available to set up standalone Linux easily, it doesn’t consume too much power, but it is powerful enough to transcode media, and it’s pretty inexpensive. The Asus Chromebox was released in March 2014. Ars Technica gave it unfavorable reviews as an HTPC setup, but much has changed in ease of installing a standalone linux OS. I found it on eBay for ~$110, brand new. Currently, Amazon sells it for $159:

Requirements
If you aim to accomplish the same setup for your Chromebox as I have, follow the guide below. Again, this is for a standalone Linux Ubuntu boot on the Asus Chromebox. This process will remove ChromeOS and does not have the option to dual-boot. Once you have finished this process, you will have accomplished the following:
- An Asus Chromebox with Ubuntu Linux 14.04, as a standalone boot.
- Plex Home Theater installed on the Chromebox, accessing Plex Media Server on the Synology NAS
- VNC server up and running, to remotely access the system
I am assuming you already have Plex Media Server working with all your media. I am also assuming that you are willing to risk bricking your Chromebox; definitely proceed at your own risk. With that said, serveral people have reported success with this process.
Step-by-Step Walkthrough
Chromebox Setup and Ubuntu Installation
Please note that the Kodi E-Z Setup Script is still in active development and options may change, or this process may no longer work. I wrote this in Feb 2015 and so the details of each step may have changed. I will try to keep this updated but please proceed at your own risk
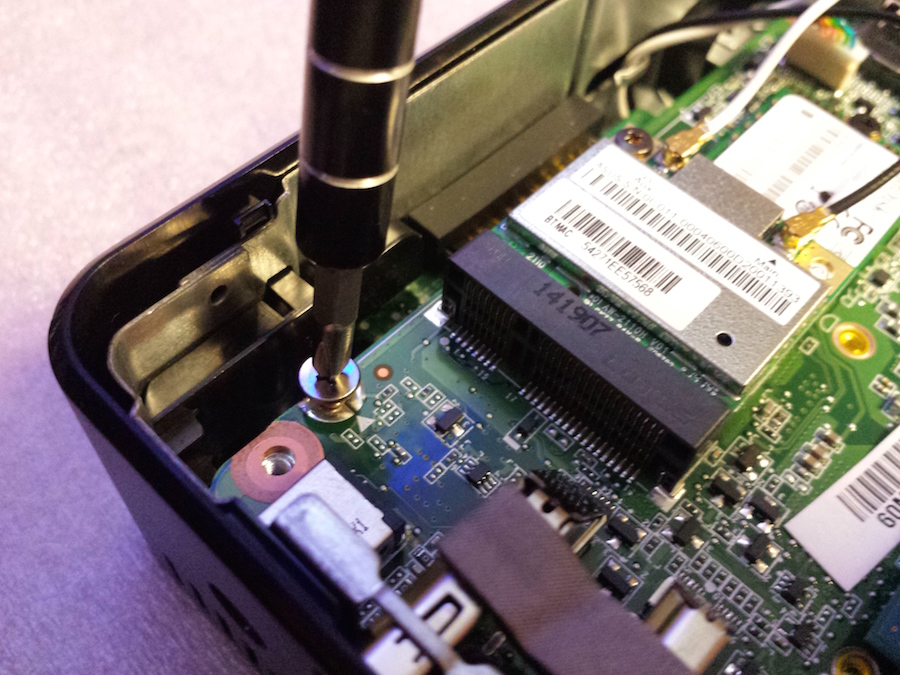
- With your Chromebox unplugged, prepare your device for the linux installation by disabling the firmware write protection.
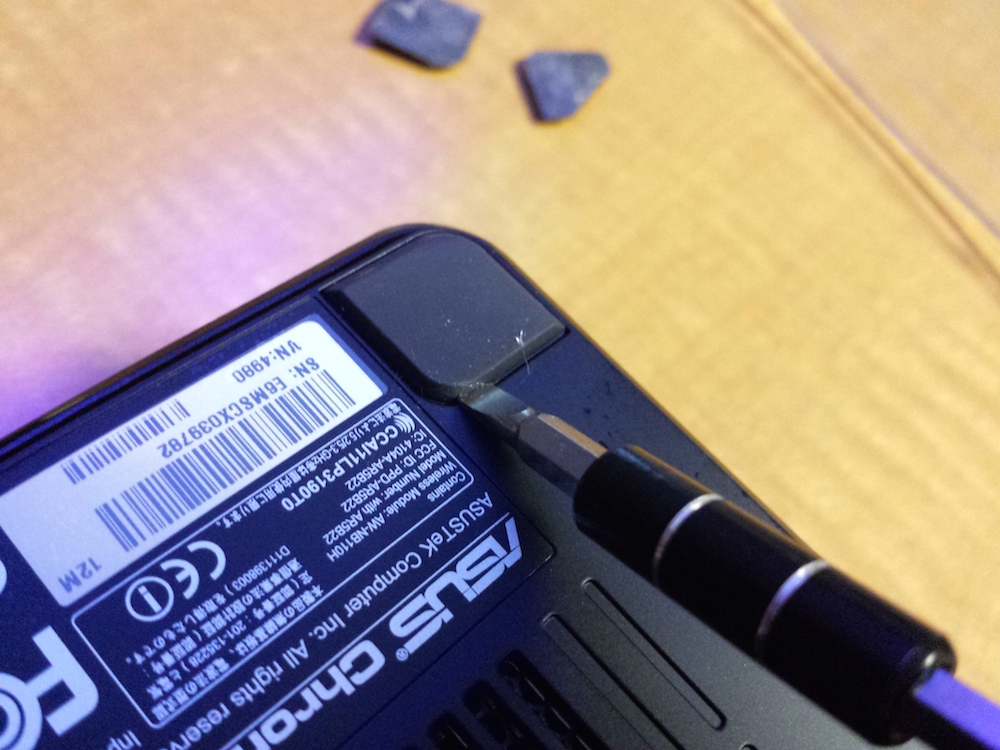
- To open the Chromebox, you need to remove the four rubber footpads. I found it easiest to use a small flathead and lift up from the inner-rounded corner of the footpad

Lift the flathead under the rubber foot, from the direction of the inner-rounded corner. - In case of any doubt from the website link above, here is the screw that needs to be permanently removed for this installation to work.

- If you like, you can install additional RAM at this point. Do make sure your RAM is PC3L, and not PC3. Using the latter will result in issues upon bootup.
- To open the Chromebox, you need to remove the four rubber footpads. I found it easiest to use a small flathead and lift up from the inner-rounded corner of the footpad
- Follow the steps at this link to get into developer mode.
- NOTE: Carefully follow these instructions. Take your time at this step. STOP at “1.3 Perform Factory Reset.” You do not need to follow that step.
- You now want to download and run the EZ setup script, provided by Matt DeVillier. You can follow the steps from the Kodi forums, but I will break it down here.
- NOTE: Most of these instructions are directly from the link above, but I want to separate those instructions to make it easier see what needs to be done.
- Power up your Chromebox, and set up the internet connection (the first screen). DO NOT continue with the set up prompts.
- Press CTRL-ALT-F2 to view the command prompt
- You will be prompted for a username. Enter:
chronos
- Enter the following to download and run the EZ setup script:
cd; curl -L -O https://mrchromebox.tech/setup-kodi.sh && sudo bash setup-kodi.sh
- You will be provided some options to choose from.
Enter 5, for Install/update: custom coreboot FirmwareEnter 6 (as of ~2017), for Install/Update: Custom UEFI Firmware. - Type Y to continue
You may be prompted to ask if you want to install the headless firmware. Go ahead and say no.. The headless option is no longer an option as of ~2017.- Backup the ChromeOS firmware to a USB stick.
- Then download and setup a USB stick to liveboot Ubuntu on a Mac or PC. **Please note that with Ubuntu will probably not install the grub EFI shim to the default UEFI boot target and this will cause your Chromebox to boot up to a black screen which is the EFI shell. See MrChromebox.tech’s FAQ which addresses how to resolve this. Otherwise you can use GalliumOS.
- Stick in the liveboot USB stick into the Chromebox, and reboot it.**
- You will have five seconds to press ESC key to display the boot menu. If you miss it simply reboot it again.
- Select the USB stick from the boot menu, and then you can proceed with installing Ubuntu.
Setting up Ubuntu
- Once you have Ubuntu installed, you can install the programs you need.
- Run Updates first. See the Maintenence commands from Ubuntu Documentation for an overview of what to run
- Installing Plex Home Theater
- Add the plexappp repository by following this documentation. If it’s confusing, you should do the following commands in Terminal:
sudo add-apt-repository ppa:plexapp/plexht
- Update the respositories:
sudo apt-get update
- Install Plex Home Theater:
sudo apt-get install plexhometheater
- Now all you need to do is configure PHT to talk to your PMS. I did this by configuring my server settings manually in Preferences.
- Add the plexappp repository by following this documentation. If it’s confusing, you should do the following commands in Terminal:
- Configuring VNC - Remote Desktop
- Ubuntu comes with Desktop Sharing by default. This sets up a VNC server.
- Type “Desktop Sharing” in the dash (the launcher/finder)
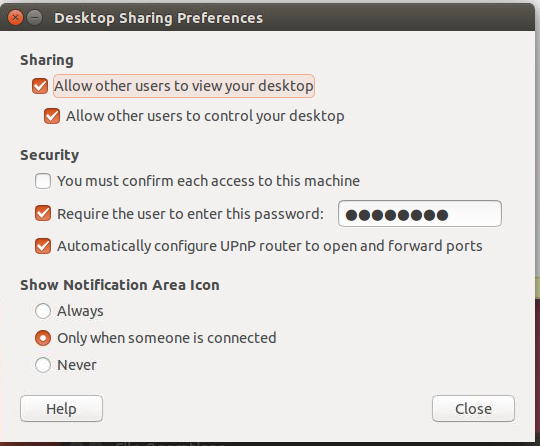
- Configure the settings so that the following in enabled as seen below:

Enable the options seen above for remote desktop sharing - You then need to disable encryption, since having this enabled seems to be an issue.
gsettings set org.gnome.Vino require-encryption false
- This change may not stay after reboot, so you can edit some settings by typing the following in Terminal:
sudo apt-get install dconf-tools
- Search for dconf Editor in dash, then navigate to org > gnome > desktop > remote-access
- Some have reported unchecking “enabled” but others haven’t had much success and resorted to finding other solutions. Defintely review those options if you’re haivng problems accessing VNC after rebooting. ‘
Summary
What you’ve accomplished, if my documentation is thorough enough (if not please let me know) is setting up the Asus Chromebox as an HTPC, with Ubuntu 14.04 installed, along with Plex Home Theater and local VNC access. If you would like to have access to your Chromebox via remote desktop outside your network (e.g., at work or another house) then I strongly recommend setting up SSH tunneling for VNC; passwords are not encrypted over the network.
Leave a comment